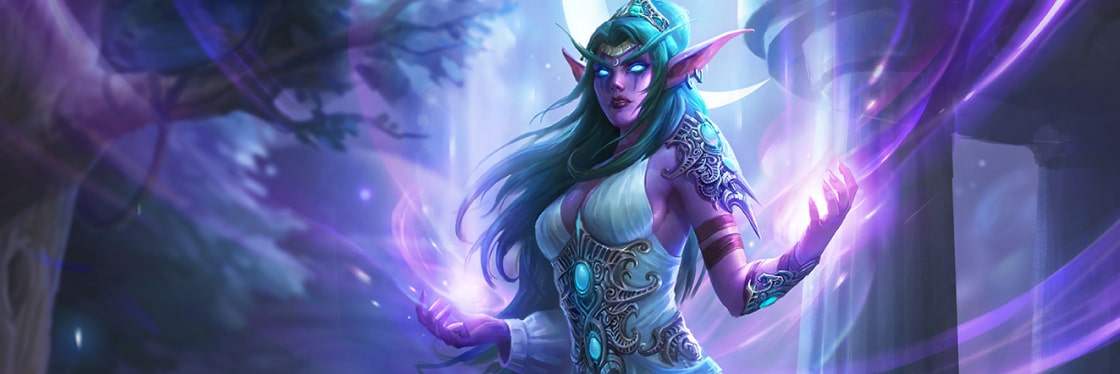
PVP guide for death knight Unholy
 |
| Hello, dear friends, I am pleased to present you a guide to the death knight Unholy. The guide is designed for the realities of patch 5.4. May the destiny be fulfilled! |
 |
|
Death Knight is the first and only heroic class in the game world of warcraft. He was introduced in the game in the patch wrath of the lich king and brought players new sensations, we can talk about it for a long time, so let’s get to the main thing. Written by me guide will be interesting, as a newcomer who started playing for the death knight, and veteran who has more than a thousand battles. Here I would like to dwell more on the mechanics of the game, rather than on the description of talants (which can be found in other guides). I hope you will enjoy this guide and increase your level of death knight play, as well as just have a good time. Let our reaper of souls crit! |
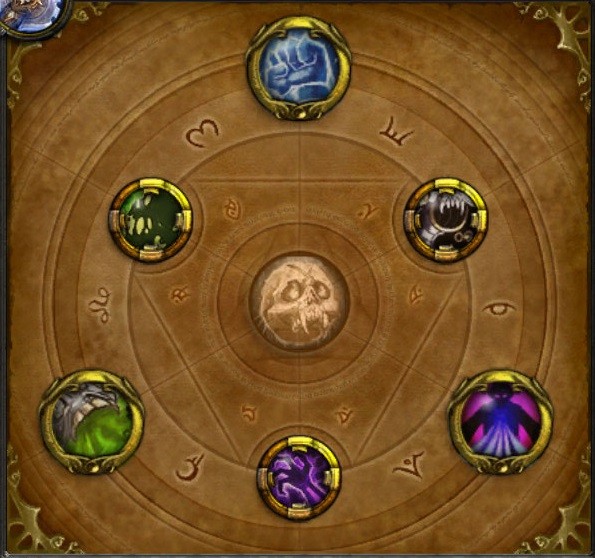
Talents
The standard set of talents for a death knight of the specialization Unholy:
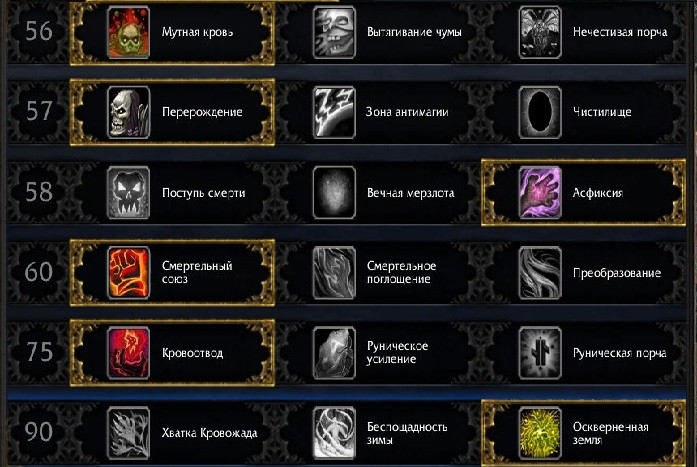
Strangulate is taken in rare cases: playing with holypal 2×2, Trying to zerg heal monk in tsg (3×3).
I would like to focus on the talents for level 60, namely:
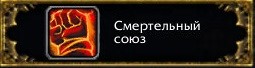 |
Death pact- Healss us for 50% of our maximum health, but takes away 50% of our pet’s health. It has a 2 minute cooldown. (You can also eat gargoyles.) |
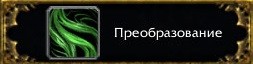 |
Transformation– Heals us by 3% of our maximum health once per second in exchange for taking 5 power runes once per second. It has no cooldown. (Can be tapped in silence). |
These are the only talents that change depending on the opponent’s set-up and the set-up you are playing in.
I want to teach you how to make the right choice between talents. In order to figure this out we have to look at the opponents damage, more specifically is it fast burst or strong tunneling. Now I will give examples on quite common setups.
For example: KFC (Hunter, Warrior, Healler) playing you, opponents will create strong tunneling damage with a large chain on the healler while sitting very tight on you. In this case, a constant heal transformations will be more profitable.
(Mage, lok, +heal (usually shaman/druid)) here we will stand in nova power runes will not be enough for regen + strong burst run from opponents, but strong tunneling damage is not. In this case a fast and strong heal will be needed, Death Pact will be much more advantageous.
These were examples of what type of regen is chosen. Why don’t you just write down which ability to take against which setup? It would be very long, and there are just nuances, so I will write a bunch of priorities:
To start, I will say that Transformation will be a very strong addition to Druid’s Hots, or Rshama’s totems and hoths, which together with Kite will give a strong heat. Deadly Alliance will be good with Holypal, Priest, and Healmonk.
If you’re up against:
Exceptions
Symbols
The standard set of talents for a death knight of the specialization Unholy:
This is the layout I prefer to take as standard.
Here I would like to talk about changing characters to match the opponents’ setup.
Large symbols
![]() –symbol of icy touch, now we can purg buffs from the enemy. It is taken as standard in all situations.
–symbol of icy touch, now we can purg buffs from the enemy. It is taken as standard in all situations.
 – Symbol of AOE, the radius of hanging AOE is increased by 5 meters. Very strong symbol in shadoucleave, as well as in sets where especially strong need AOE, although as a DK we always have to support pillboxes and this symbol helps us in this. Recommended.
![]() – Symbol of dark simulacrum, decreases ability recovery time by 30 seconds, in case of changing symbols change this one. Very strong symbol in skillful hands. In cases of using the ability at random, the symbol is NOT RECOMMENDED!
– Symbol of dark simulacrum, decreases ability recovery time by 30 seconds, in case of changing symbols change this one. Very strong symbol in skillful hands. In cases of using the ability at random, the symbol is NOT RECOMMENDED!
![]() – Ice Stability Symbol, reduces the recovery time of this ability to 1 minute and 30 seconds, but also reduces its duration to 3 seconds. This symbol can be taken against setups that kill for stun, such as Destrolok + mage. It can be taken against Warriors, Destroloks, and DKs with hitters to get out of stun more often.
– Ice Stability Symbol, reduces the recovery time of this ability to 1 minute and 30 seconds, but also reduces its duration to 3 seconds. This symbol can be taken against setups that kill for stun, such as Destrolok + mage. It can be taken against Warriors, Destroloks, and DKs with hitters to get out of stun more often.
![]() – Healing Magic Symbol, Reduces Antimagic Shell recovery time by up to 50% (depends on the damage absorbed (the less damage, the less in cd)). A good choose for catching fear priests, for the shaman’s root totem, and will also be good against 1 caster dd. A little worse against 2 caster dd, because the damage in the green is a lot, and the recovery of the ability will be close to the normal time. Take it in twos against casters, as well as DK. In 2v2 Take vs DK and casters
– Healing Magic Symbol, Reduces Antimagic Shell recovery time by up to 50% (depends on the damage absorbed (the less damage, the less in cd)). A good choose for catching fear priests, for the shaman’s root totem, and will also be good against 1 caster dd. A little worse against 2 caster dd, because the damage in the green is a lot, and the recovery of the ability will be close to the normal time. Take it in twos against casters, as well as DK. In 2v2 Take vs DK and casters
 – Strangle symbol, increases the cast fat by 2 seconds (up to 7). Take this symbol if you don’t take asphyxia.
![]() – Death and decay symbol, now our puddle (Death and decay) slows down all targets by 50%. We take it when we need to slow down milishmen to save a hit. We can take it against restor druid in 2v2.
– Death and decay symbol, now our puddle (Death and decay) slows down all targets by 50%. We take it when we need to slow down milishmen to save a hit. We can take it against restor druid in 2v2.
The other characters are not suitable for us, or are weaker than the ones listed.
Small symbols
![]() – Death Embrace Symbol, gives us 20 rune power back when hitting a pet/Gorgole/Druv DK. Take it as standard.
– Death Embrace Symbol, gives us 20 rune power back when hitting a pet/Gorgole/Druv DK. Take it as standard.
![]() – Unrelenting Grip Symbol, Restores death grip if the ability failed due to the target’s immunity. Take it as standard.
– Unrelenting Grip Symbol, Restores death grip if the ability failed due to the target’s immunity. Take it as standard.
The third symbol is at your discretion.
Basic Stats
The basic Stats for a death knight are as follows:
Marksmanship (cap=3%)-> Strength-> Mastery-> Crit-> Haste-> PvP Strength-> Expertys.
We collect marksmanship in order not to miss opponents.
Strength is the main stats, increases damage from all our abilities, also affects the amount of hit absorption from necrotics.
Mastery, increases our damage from dark magic (death coil, gargoyle, lash, blood plague (Dot).
Crit, increases the probability of a critical effect.
Haste, decreases the recovery time of runes.
PvP Strength, increases our ability damage on players, roughly a 1:3 ratio of strength to PvP strength.
Expertise, decreases the probability of parry on players. Mastery is not collected, but in the current gyre the mastery cap will be gained anyway.
Why is Expertyse not collected?
Stones, Chants, and Reforging
In the top gear stones, chants and reskinning will look like this:
P.S. who is too lazy to read and think, you can just copy from my armory –http://eu.battle.net/wow/ru/character/%D1%81%D0%B2%D0%B5%D0%B6%D0%B5%D0%B2%D0%B0%D1%82%D0%B5%D0%BB%D1%8C-%D0%B4%D1%83%D1%88/%D0%9F%D1%83%D0%B7%D0%B8%D0%BA%D0%BE%D0%B2%D0%B0%D1%82%D1%80/advanced.

![]() – Despotic Primordial Diamond (special nest), +665 PvP strength and +775 PvP resistance. In case you cannot acquire this stone, there is an alternative – Roaring Primordial Diamond (+216 strength and +3% to critical effect strength).
– Despotic Primordial Diamond (special nest), +665 PvP strength and +775 PvP resistance. In case you cannot acquire this stone, there is an alternative – Roaring Primordial Diamond (+216 strength and +3% to critical effect strength).
![]() – Relief pristine ruby (red nest), +160 strength.
– Relief pristine ruby (red nest), +160 strength.
![]() – Master’s Sunset Onyx (Yellow Nest), +80 strength and +160 skill.
– Master’s Sunset Onyx (Yellow Nest), +80 strength and +160 skill.
![]() – Strong Imperial Amethyst (Blue Nest), +80 strength and +80 PvP strength.
– Strong Imperial Amethyst (Blue Nest), +80 strength and +80 PvP strength.
I observe the color of the cells to get the bonus .
Enchanting
Shoulders – Great Tiger Fang Inscription
Back – Critical Strike III
Chest – All Characteristics X
Wrists – Strength VII
Hands – Strength VI
Belt – Belt Buckle of Living Steel
Feet – Gnewskin Overlays
Feet – Pandaren Tread
Weapon – Rune of the Fallen Knight.
Reforging
Reforging is done with priority to Mastery.
Marksmanship (cap=3%)-> Strength-> Mastery -> Crit-> Haste -> PvP strength -> Expertise.
After gaining marksmanship (3%), re-forge crit or Haste into Mastery, if you can’t re-forge into Mastery, re-forge into crit.
Interface
Each player has their own interface that is comfortable to play in, and familiar to the eye.
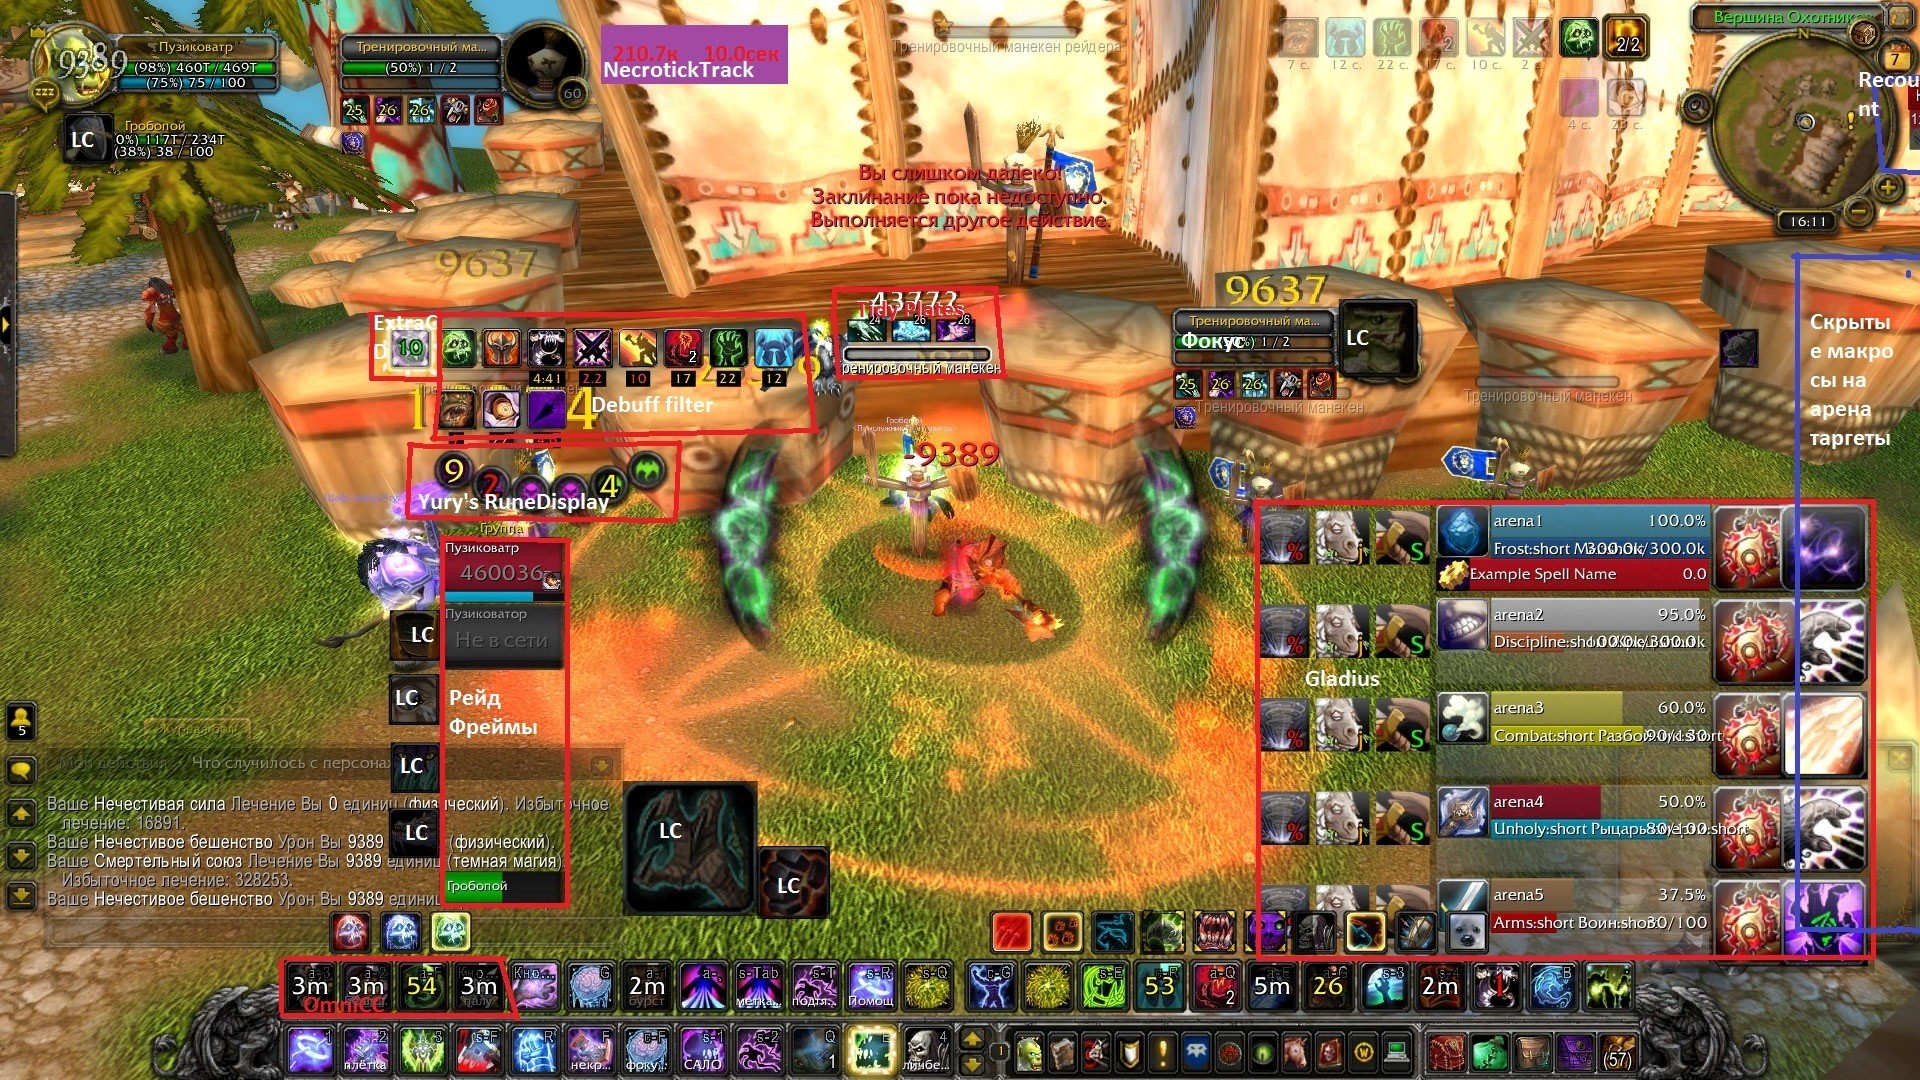
Of course, like many others, I play with addons. Now we will get acquainted with addons that I play with.
DebuffFilter – Display all procs.
ExtraCD – Displays global procs cooldowns.
LoseControl – Displays control on yourself, allies, opponents, and pets. (Designated as LC)
NecrotickTrack – Displays the number of necroticks on the target and yourself.
Gladius – Arena frames, enemy control, and diminishing control.
OmniCC – Digitally display the rollback of abilicons.
Tidy Plates – Dot display over the target’s health bar overhead.
Yury’s RuneDisplay – It’s runes, baby
As I believe, the most important thing for DK – is a well-tuned runes, which are always visible and do not need to look in the corner of the screen, as well as the display of procs next to the runes will help us immediately outweigh the strong dots, and all the time do not look for procs in another part of the screen. NecrotickTrack – a bar that shows the number of necrotics on the target in numbers, as well as the time until they fall.
Macros
At the beginning of the macro write #showtooltip the name of the abilic – this gives us to see the rollback, and the description of the abilic that we put here.
Macros for focus:
/cast [target=focus] Ability name
Macros for arena targeting:
/cast [target=arena1] Ability name
Macros for petattack
/cast Ability name (attacking ability (e.g. whip))
/petattack
/cast snag
When we press this macro we will attack with the ability we have entered, + and also our pet will constantly hit our target instead of running all over the arena after the opponents we just got off.
Macros for lichburn
/cast Lichbern
/cast [@player] Death Lick
Macros for pet’s hit
/cast [target=pet] Death Lick
Macros for applying an abilify to an ally
/cast [target=player name] Abilify name
Macros for modifier
/cast [target=arena1, modifier: shift] Abilify
/cast [target=arena2, modifier:alt] Abilify
/cast [target=arena3, modifier:ctrl] Abilify
Macros to cancelaura
/cancelaura Hand of Protection
/cancelaura Divine Shield
/cancelaura Ice Block
/cancelaura lichbern
“Rotation.”
After we have chosen talents and symbols, dressed our DK and Enchantment him, we can proceed to the analysis of “Rotation”.
“Rotation” is in quotes because the death knight has priority talents, but let’s call it rotation.
Before we get into rotation, we first need to familiarize ourselves with the talents that DK uses in combat. ![]() – Blood Boil, requires 1 blood rune, deals AoE damage, converts blood rune to death rune, and along with the talent
– Blood Boil, requires 1 blood rune, deals AoE damage, converts blood rune to death rune, and along with the talent ![]() (muddy blood), outweighs our AOE on other opponents.
(muddy blood), outweighs our AOE on other opponents.
 – Plague Strike, requires 1 rune of unholiness, used to infect enemy AOE.
 – Scourch Strike, requires 1 rune of unholiness, a powerful attack that deals physical damage and dark magic damage.
![]() – Ice Touch, requires 1 ice rune, converts the ice rune to a death rune, and together with the ice touch symbol, removes the buff from the opponent.
– Ice Touch, requires 1 ice rune, converts the ice rune to a death rune, and together with the ice touch symbol, removes the buff from the opponent.
 – Ice Chaines, requires 1 rune of ice. Slows down the enemy.
 – Death and Decay, Puddle is also called DND. Requires 1 rune of wickedness, cast only under two or more opponents, if the target is one hit with a whip.
 – Necrotic Strike, requires 1 death rune. Inflicts Heal Absorption on the opponent, effect is stacked.
 – Soul Reaper or Execut, requires 1 rune of unholiness. Initially deals a small amount of damage and debuffs the target, after 5 seconds, if the hitter has less than 35% health, it deals a lot of damage, if the effect is critical, then it is usually a 100% kill. The debuff can be dispelled.
 – Death’s Coil requires 32 rune power, deals high damage from dark magic. When using this ability, we get two buffs that come with it (
 – The infusion of darkness and –
  Blood charge).
– Darkness Infusion. Each charge increases the damage dealt by our pet by 10% (up to 50% in total). With a 5 charge infusion we can use способность – Dark Transformation.
 – Dark Transformation, requires 1 rune of unholiness, increases the pet’s damage dealt by 100%, and enhances all of the pet’s abilities.
 – Blood charge, used to restore a fully depleted rune, + restored by the rune of death.
 – Winter Mountain. Gives us a buff for 5 minutes, has a cooldown of 20 seconds, but its + is that when you use it, it accumulates us 10 power runes!
 – Deathstrike, requires 1 Rune of Ice and 1 Rune of Wickedness. It is a death attack, so we can hit ourselves when using this ability.
 – Decay Strike, requires 1 rune of blood and 1 rune of wickedness, also turns these runes into a rune of death when used. It is good for knocking down shaman totems, otherwise it is useless (ice touch + blood boil do more damage).
![]() – Fulls, turn on all procs, + press trinkets and racial abilities (orc or troll)
– Fulls, turn on all procs, + press trinkets and racial abilities (orc or troll)
![]() – Anti-magic shell or simply AMS. In addition to the protective ability, it can be used as an attacker because in addition to immunity to magic slowdowns, when absorbing magic damage, it accumulates the power of runes.
– Anti-magic shell or simply AMS. In addition to the protective ability, it can be used as an attacker because in addition to immunity to magic slowdowns, when absorbing magic damage, it accumulates the power of runes.
Now that we have familiarized ourselves with the abilities we can move on to the rotation.
At the beginning of the battle the death knight has 6 runes in his arsenal: – 2 runes of blood, 2 runes of ice, and 2 runes of wickedness.
We also have ![]() power runes, but at the beginning of the battle it is at 0.
power runes, but at the beginning of the battle it is at 0.
In addition to these runes there are runes of death, the rune of death can be any of our runes. To get the rune of death on the rune of blood, we use blood boiling, and the rune of death on the rune of ice use ice touch. Also you can get the rune of death on the rune of wickedness, for this you need to use the ice touch rune of death, which is on the rune of blood.
Targets in battle:
Tips:
Playing as a death knight
In this part of the guide I want to tell you what a death knight should do in the arena, as well as show you how to most effectively humiliate hitters, make strong sweeps, tell you about interesting “stuff” and simply, the role of the DK in the arena.
Now, after we have dressed our DK, familiarized ourselves with the abilities he uses, we can go to the arena. Of course, playing in the arena is quite different than beating a dummy in town and I want to explain and show you what we should do in the arena.
The role of the DK in the arena: Our favorite developers gave us DKs a lot of damage, especially AOE, but we have no control and no safe for our teammates. We have to constantly deal damage, bring pain and suffering to the enemy team, humiliate enemy healers, and try to at least somehow save our teammates (greap opponents, in a strong need to give asphyxiation in the dd)
Start of the battle: there are several options how to start the battle. They depend on the set-up in which you play and on the opponent’s composition.
1) Normal start – We start the fight with ice shackles (slow down the opponent) or DND (if you took the symbol for slowing down), kill the opponent and transfer diseases to other targets, further on the “Rotation”.
2) The game with Warlcock – Dastardly Wars and Monks will try to knock down a big portal, we have to prevent it, but the trouble is that the usual shackles can’t do it. In this case we can give asphyxia to dd, but he can trinkle and still shoot it down. There is also a variant with otgrip, then you need to immediately run away from your blacksmith and otgrip the opponent from him, while he has not even reached the middle of the arena. In other cases, stick to point 1).
3) Playing with Hunter – Hunter can give you a lot of control, but the trouble is that his control is thwarted by our ailments. Here you will need to pour into the target you agree on and try not to finish off other targets.
4) Playing against stealthers – At the beginning of the fight we should try to knock them out with DND, and if we fail, we can try to knock them out with blood boil. Immediately inform your teammates about this, so they can also enter the kombat. Further stick to tactic 1).
5) Break into a hit or swap with a hit – Usually in TSG with equal hits, run to the hit and stick to point 1. Video of the start of the fight
Switch: the most effective switch will be when we get all procs. When we get procs, we press our trinkets and send the gargoyle to the target we want to play, but we don’t go to it yet. The gargoyle goes down to the ground for about 4 seconds, during this time it doesn’t do damage and we, while it is going down, have to kill all the targets and after that we pull up the target we sent the gargoyle to, kill it, do a couple of hits, give asphyxia and kill it (knock out the trinket and a lot of cooldown). Video Switch
Don’t feel bad if you don’t kill a healer, it won’t happen every time, but our main goal for this match is to take out as much stats as possible. So for example paladins will have to hit a bubble or give up a trinket and a lot of kd to survive, otherwise they will die. This won’t work for monks.
Trixes and tips:
Setup description
TSG – Warrior + DK + Heal (paladin or rsham or monk are better). As a rule, the game comes down to killing hil. It is good to kill destrolokov. With monks is much more difficult, but you can take strangle and try to kill for stan vara + strangle. You can also knock the trinket out of the hitman and swing at him. Usually the fight starts with a dd get procs and swich into the hitman. If you are very difficult and do not let you play a hit, turn to dd and let your warrior play a hit. In my opinion quite strong and easy setup for DK. 2nd place.
PHD – Hunter + DK + Hill (hpal/rsham is better, but others are good too). Hunter can give out a lot of control, which will give us a good opportunity to play dd, but know that our dots will take away all control. It’s also possible to control the dd and kill the heal. I will give this setup the 3rd place in terms of strength.
GSK (Heroic Shadow Cleave) – SP + DK + Hill (Shaman is better). In this setapa manages to make a very strong switch under Nastaq SP, and silence and asphyxia will not give a chance to survive the hit, as well as do not forget to podgripovat hit to your SP and do double or triple firm.
Shadow Cleave – Alok + DK + Hill (better shaman). We give out a lot of AoE damage, if necessary grypovat with partners annoying miles dd. Razdotyvayut everything that moves and go to press the hit, and at this time will die and his partners. Currently the strongest set-up for DK. 1 place.
Alaska – Mage + DK + Hill (any). Very strong burst hit both AoE and targeting combined with mage control will give you the ability to kill any target.
DK + Elem + Rdru. Strong tar
The ending
So the death knight is a class that should deal a lot of damage, but the control and deathwing abilities are almost non-existent, and the best we can do is to wind up the opponents into deathwing with our damag.
Don’t forget to subscribe to my Twitch channel http://www.twitch.tv/puzikovatr
That’s all for now, thanks for your attention and good luck in the arenas! If you have any questions or find mistakes in the guide, write in the stream, in game or in this thread.
 World of Warcraft